Timescapes Maps User Guide
History Maps
- FULL COLOUR MAPS OF THE ANCIENT WORLD
- OVER 1500 SITES WITH POP-UP INFO CARDS, IMAGES, VIDEO AND WEBLINKS
- DIGITAL SO CAN BE VIEWED AS BIG OR AS SMALL AS YOU NEED • INSTANT UPDATES
- 3-DIMENSIONAL
- ULTRA HIGH MAGNIFICATION
- MODULAR / OPEN SOURCE : MAPS CAN BE RECONFIGURED AND CUSTOMIZED
- NETWORK LINKING FOR SMALL FILESIZES AND FASTER LOADING TIMES • ADDITIONAL MAP PACKS AVAILABLE (BATTLES, GEOGRAPHIC FEATURES ETC)
- BUILDS INTO A GIANT OPEN-ENDED DATABASE / SITE LIBRARY
Installation and Navigation
Getting started
Loading the maps
Editing and Saving
You might want to customise your map in certain ways: for instance, perhaps you would like to regroup certain territories under a different heading.
You can create new folders by using the contextual menu (right-click and hold on the sidebar).
Elements in the sidebar are named and edited in the usual way. Double-click on name fields to enter text and use the standard cut and paste commands to move text around.
If you do decide to make changes to the maps, be sure to save your edits (File > Save > Save My Places) before closing the program.
Each Timescapes Map Pack includes:
- Individual map files (.kmz/ .kml)
- The Timescapes Handbook (.pdf)
- The Timescapes User Guide (.pdf)
- Accompanying artwork (.jpeg)
Setup
The Sidebar
Keyboard Shortcuts
🠕 UP arrow Scrolls up the list
🠗 DOWN arrow Scrolls down the list
➞ RIGHT arrow Opens folder
🠔 LEFT arrow Closes folder
— SPACEBAR Enable/ disable check-box
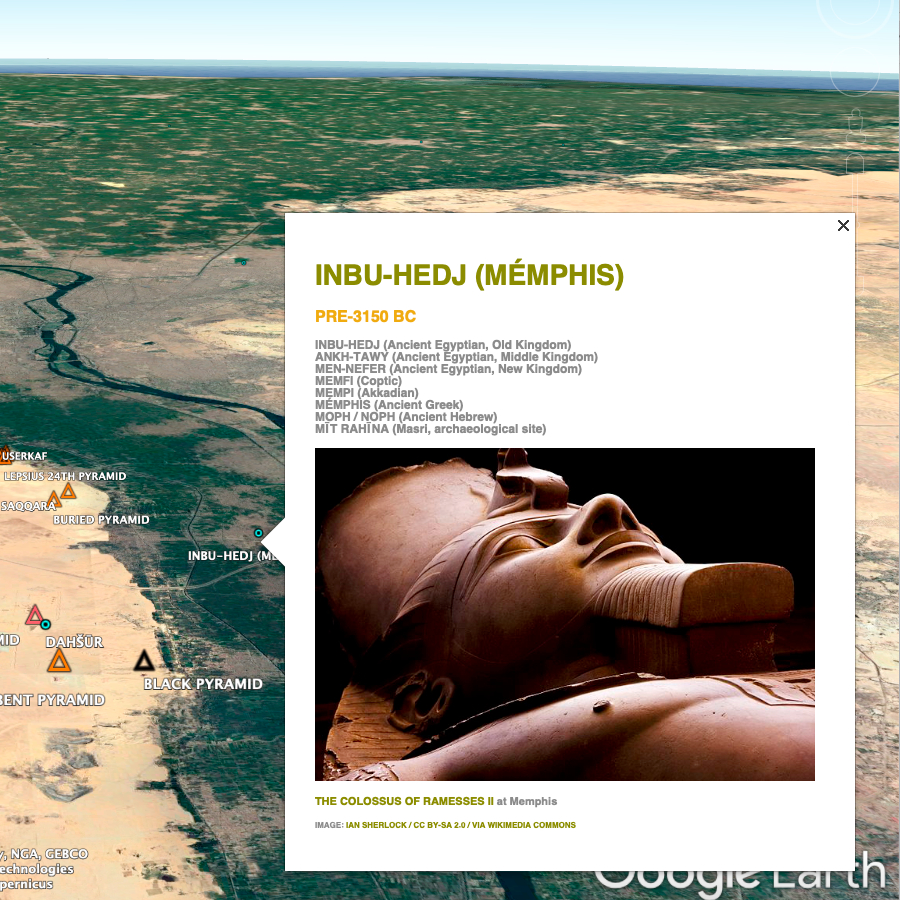
Info Cards
The Browser
You may find that it is easier and faster to access the Info Cards by clicking on the site names on the map and to just use the Sidebar for switching elements in and out.
On mobile phone and tablet platforms the maps are navigated via the touch-screen functions. These versions are currently in development.
There are many third-party layers available online which provide additional information to complement the Timescapes experience. You can find a list of them in the Acknowledgements section of the Timescapes Handbook.
A full list of navigational key commands is provided here: https://support.google.com/earth/answer/148114?hl=en
Updates
Every time a Timescapes map is opened up, it loads all the data from our servers via Network Links. These are simple link files (they’re the folders in the sidebar with the green ball) (Fig.3).
If you happen to delete the file inside the Network Link folder, re-clicking the folder will generate a new file.
Please do not delete any of the Network Links!
Layers
Adding and subtracting layers is the way we view the maps in different ways.
Certain layers can be useful at certain times whilst intrusive at others. Knowing which layers complement Timescapes and where they are located is key to getting the most out of the maps.
There are essentially two areas where the Google Earth Pro user can alter settings: GEP’s own settings in the Preferences (Top menu > Google Earth Pro > Preferences) and the user’s own settings in the Sidebar.
Google’s own User Guide is here: http://earth.google.com/intl/ar/userguide/v4/index.htm.
In the meantime, the following sections will break down the features that are most relevant to Timescapes.
The Sidebar
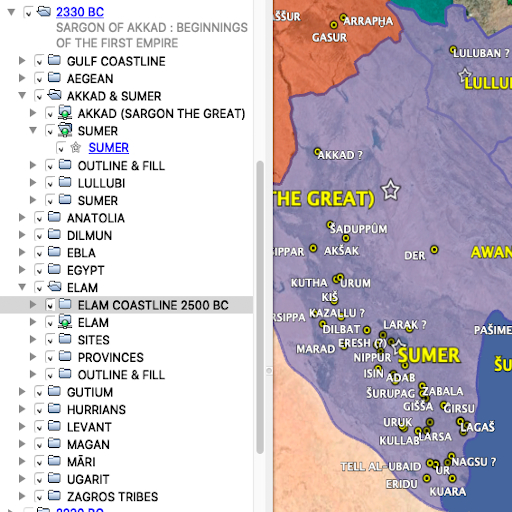
In the Sidebar at the left (if you don’t see it, go to (top menu) View > Sidebar, or keystroke Alt+Command+B)
You will see all the available options that can be displayed on the maps.
Try and only enable the options you really need. Fewer options means that the maps look cleaner and less cluttered and may load faster.
Let’s take a look at the various options available to us in Google Earth Pro’s Layers section (at the bottom of the sidebar on the left).
Clicking the arrow next to Primary Database reveals the drop-down menu. Moving down the menu items in order we find:
Borders & Labels
Disabling Labels is probably advisable most of the time (too many names crowd the map and the modern names are not relevant to the ancient world). However, it is quite useful to have this option to hand so that you can quickly toggle these names on and off for reference.
You may also (in the same menu) also occasionally need to toggle modern day international borders for reference.
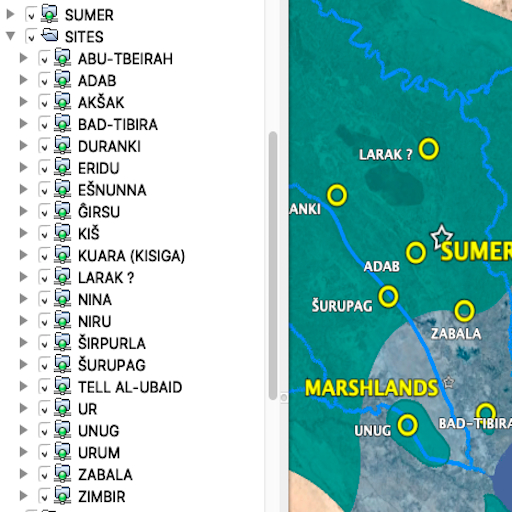
Places
The Places menu only really enables modern locations like airports and national parks so is best left off.
Photos > Google Maps Photos
In this menu section you can enable an additional layer of Google Maps photos relating to the areas you are navigating.
This can be a useful layer for general pictorial information but unlike the Timescapes images attached to the Info Cards, the Google Maps images are not period-specific: so for instance if you are viewing the Timescapes map for 1000 BC with Google’s Photos option turned off, you will only see pop-ups of images which are relevant to that period.
If the Photos option is enabled, those images will be from all time periods without chronology or distinction and the majority will reference modern sites which are not specifically relevant to the Timescapes map in question.
For this reason I tend to suggest leaving Photos off most of the time. If you do enable the option however, don’t forget that, as often in Google Earth Pro, the number of markers available is dictated by the magnification of the map at any given time – in other words, zooming in will increase the number of images, zooming out will reduce it.
Roads and Transportation
Generally I find that enabling Roads clutters and confuses the maps. However, given that modern highways are very often built on top of ancient routes, it can be helpful to toggle Roads on in order to discern patterns of ancient trade and communication.
3D Buildings
Turn this option on!
With 3D Buildings option enabled, you can view all the 3D models of ancient sites created by the Google Earth Pro user community. Perhaps not as useful in terms of detail as the 360º Cities feature, but still fun to look at and helpful for a general sense of scale.
The 3D Buildings option also enables modern cities to be viewed in 3D (although of course this is not especially relevant to maps of the ancient world).
Weather
Disabling this option is recommended.
Gallery
Most of these options do not really add anything to Timescapes in a historical sense.
More
The only option that may be interesting in this section is Water Body Outlines
The Preferences section (top menu > Google Earth Pro Pro > Preferences)
The preferences section is where changes can be made to the general operation of Google Earth Pro.
Most of the default settings here work fine for our purposes, but you may want to tweak certain aspects of the performance, such as the speed of responsiveness to your movements on trackpad or mouse, or the overall size of icons or labels.
For an in-depth guide to the Preferences, read this Google Earth Pro User Guide:A quick word about Fonts:
Issues and Troubleshooting
A project of this size will inevitably throw up the occasional bug for somebody, somewhere, at some point. Most of the time, a reboot of Google Earth Pro will fix any issues.
Here are a couple of known issues in Google Earth Pro when running Timescapes:
Upon loading you may encounter an error message to do with .kml handling. You can safely hit the ‘Ignore All’ command, this will in no way affect the project.
Very occasionally you may encounter a bug which turns all the place names into black strips. While somewhat alarming, this is easily fixed by rebooting Google Earth Pro.
This bug happens when the main title link in an Info Card is clicked and the program encounters a webpage which doesn’t play nicely with GEP’s internal browser.
If this happens to you, please let us know which link caused the error.
To prevent any problems associated with the GEP internal browser, you have the option to view all content in the external browser of your choice.
To select this option, go to (Top Menu) > Preferences > General > Display > Show Web Results in External Browser.
For any issues pertaining to Google Earth Pro, please visit the Google Earth Help Community here:
https://support.google.com/earth/community?hl=en
For any issues that cannot be resolved in this user guide, please send an email describing the issue to the Timescapes Facebook page at
https://www.facebook.com/Timescapes-History-Maps-894070474130375